Let’s face it, sometimes a Hyper-V gets stuck in a funny state and you can’t shut it down from the UI. Fear not, you can easily force it down using powershell.
Firstly, get the guid of the VM.
$VMID = (Get-VM '<name of the VM from the hyper-v manager (or Get-VM)').id
With all the migration from VMware to other sources, Hyper-V is making quite a comeback. Hyper-V is a lot better than the good (aka bad) old days, but you still need to know how to handle certain quirks.
In this case I needed to change the resolution of my Hyper-V windows guest to something higher as it was stuck on the default 1152×864.
It’s simple to fix, just shutdown your VM in the Hyper-V manager (or use powershell) and when the system is down, open a powershell window and use.
Set-VMVideo -VMName "<Name of VM in Manager>" -HorizontalResolution 1920 -VerticalResolution 1080 -ResolutionType Single
Then when you power the VM back on and access via the Hyper-V display option you will have a VM with the larger screen resolution.
The recent changes to VMware by Broadcom have left many of us pondering alternatives for our home labs. As a former user of the free ESXi, I found myself in a predicament when that option started disappearing.
Enter oVirt, an open-source project that serves as the upstream counterpart to Red Hat Virtualization (RHV). As someone familiar with Red Hat products at work, I was intrigued by oVirt’s potential. Interestingly, Red Hat itself is planning to exit the RHV space, which seems like a bold move given the industry landscape. However, oVirt remains open-source and, hopefully, resilient. Oracle also utilizes oVirt for its OLVM product.
The oVirt documentation is a mixed bag—sometimes comprehensive, sometimes lacking. When you encounter issues, consider raising a GitHub defect. As part of my contribution to the community, I’ll do my best to address them.
So, how does one dive into the world of oVirt?
Hypervisor-Only Node: Like ESXi, oVirt allows you to create a hypervisor-only node. This minimalist setup is familiar and straightforward.
Self-Hosted ovirt-engine: Think of this as the vCenter equivalent in the oVirt ecosystem. It manages your oVirt environment. While the documentation can be verbose and occasionally outdated, the following steps should help you get started:
Choose Your Path: Opt for the oVirt Node and self-hosted ovirt-engine setup. It’s my personal favorite and promises an engaging experience.
Storage Connection: I’ll be connecting my oVirt Hypervisors to my QNAP NAS via NFS. Simplicity wins in my home lab.
Remember, oVirt is an adventure—a chance to explore beyond the familiar VMware landscape. Let’s embark on this journey together!
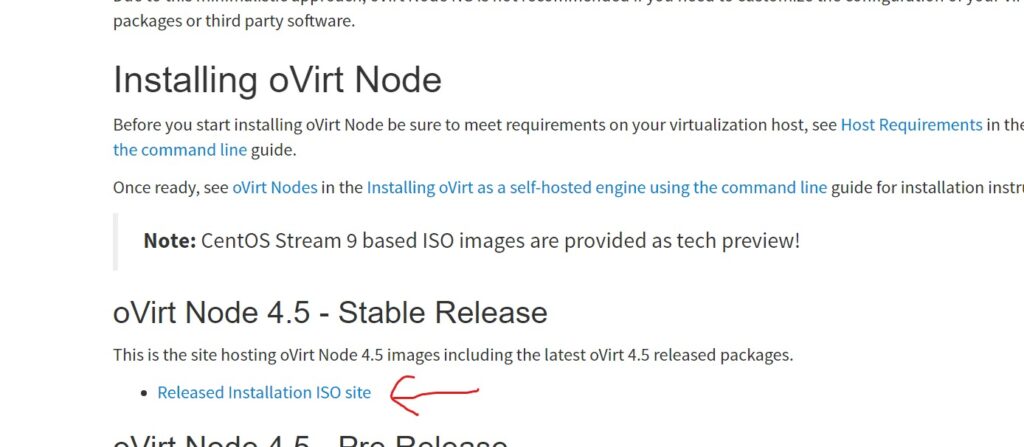
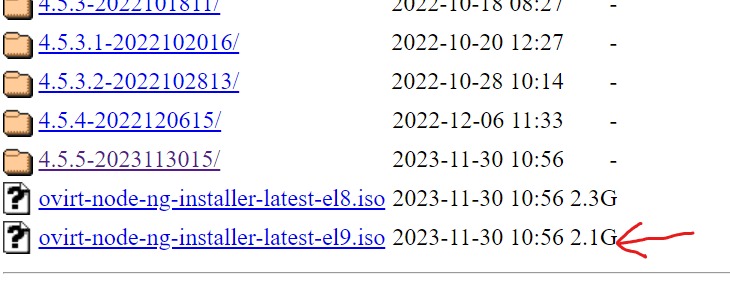
Getting the media
Head off to oVirt Node | oVirt to download the ‘hypervisor-only’ ISO. I chose from the 4.5.5 released ISO’s and I picked the CentOS 9 version.
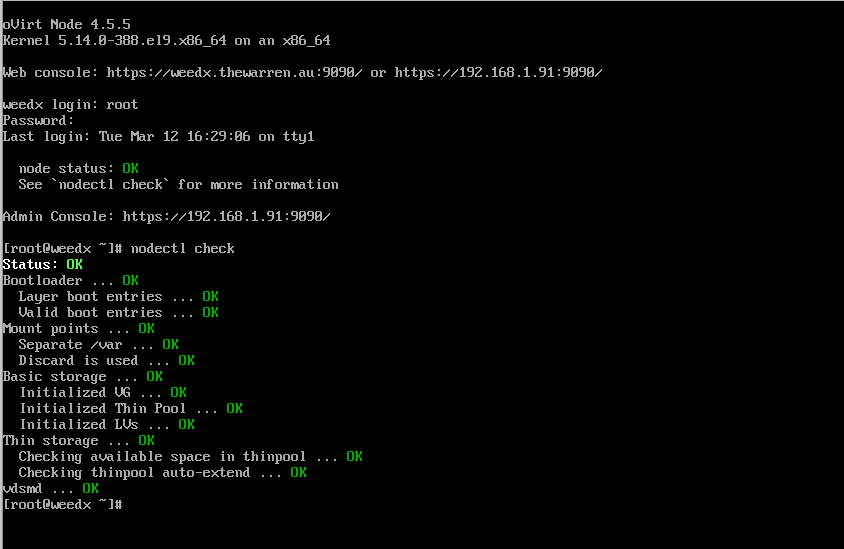
Install the Hypervisor
Fortunately, the hypervisor install is very simple, it’s just another anaconda-based install ISO. You can find detailed instructions at this link Installing oVirt as a self-hosted engine using the command line | oVirt and when you’re done, you can logon and you should see the following.
Deploying the self-hosted engine
So, how do you deploy the self-hosted ovirt-engine – that is, the ovirt engine appliance hosted on the oVirt node you just built. It’s a simple command, but it will take a while to execute. It downloads / installs an RPM that contains the appliance OVA. It powers it on, patches it and then installs the ovirt-engine into the new virtual machine.
The ovirt-engine will then perform extra configuration of your oVirt node and as part of the last step it will copy the ovirt-engine VM to your shared storage. You’ll see the important parts in the process detailed below.
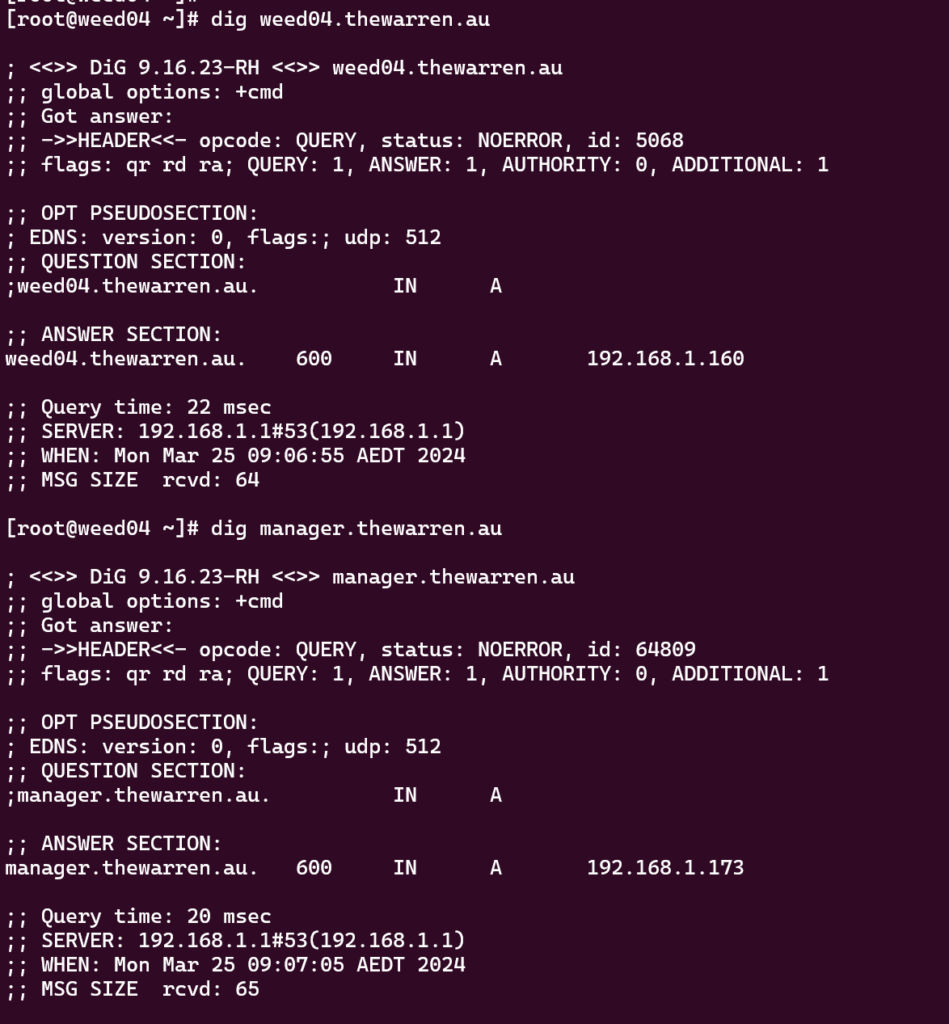
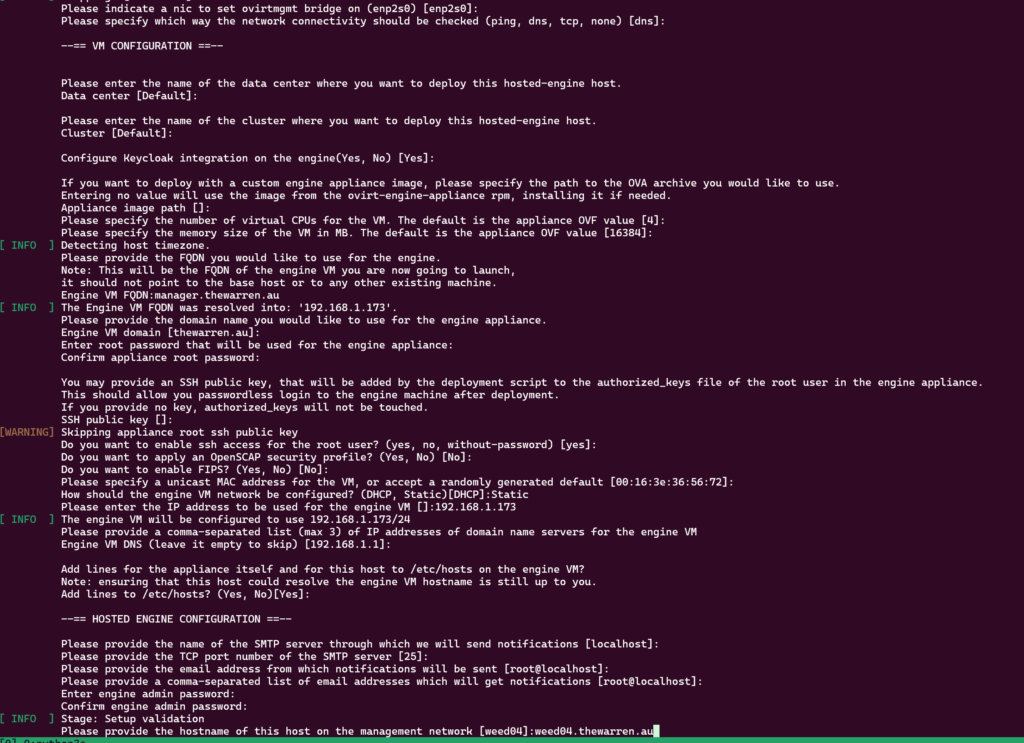
Firstly, before you start, make sure the oVirt Node is defined in your DNS and make sure the ovirt manager is also in your DNS.
Start tmux, and then run the installer.
There are lots of questions to answer, but they’re mostly self-explanatory. Note: The –4 option passed to the command sets up IPv4 only.
Here is how I responded to the questions, note, both the VM name and the node name must resolve in the DNS that you nominate.
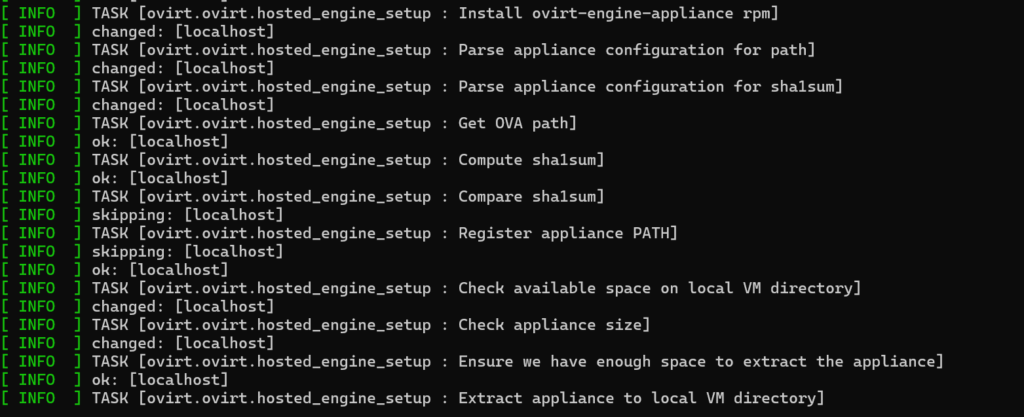
The setup script has just about everything it needs at this stage. I’ve called out some step that will take a while to perform.
This step takes a while as the RPM contains the base OVA for the ovirt-engine appliance, it’s a big RPM.
and this takes even longer
Once the OVA is finally available, it gets deployed and powered on. Once deployed, the tool will install the ovirt-engine on the new VM and apply all the patches. This will take another long time.
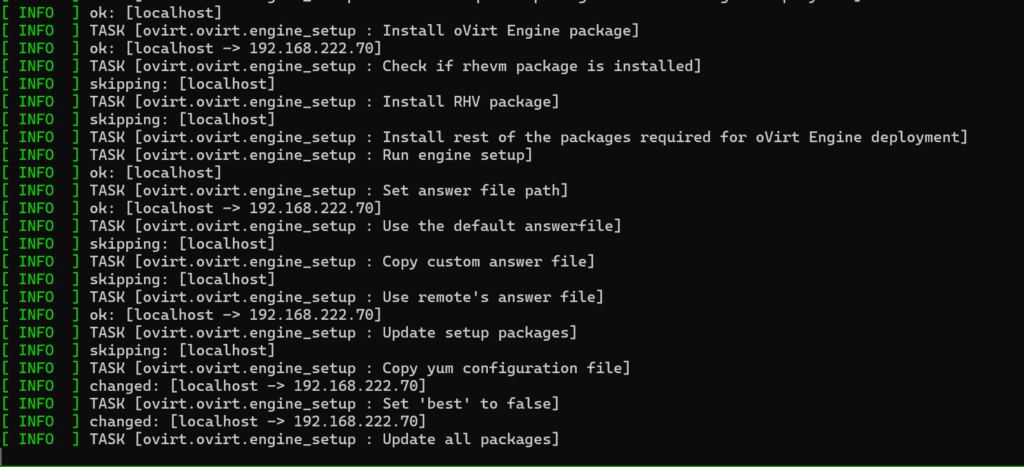
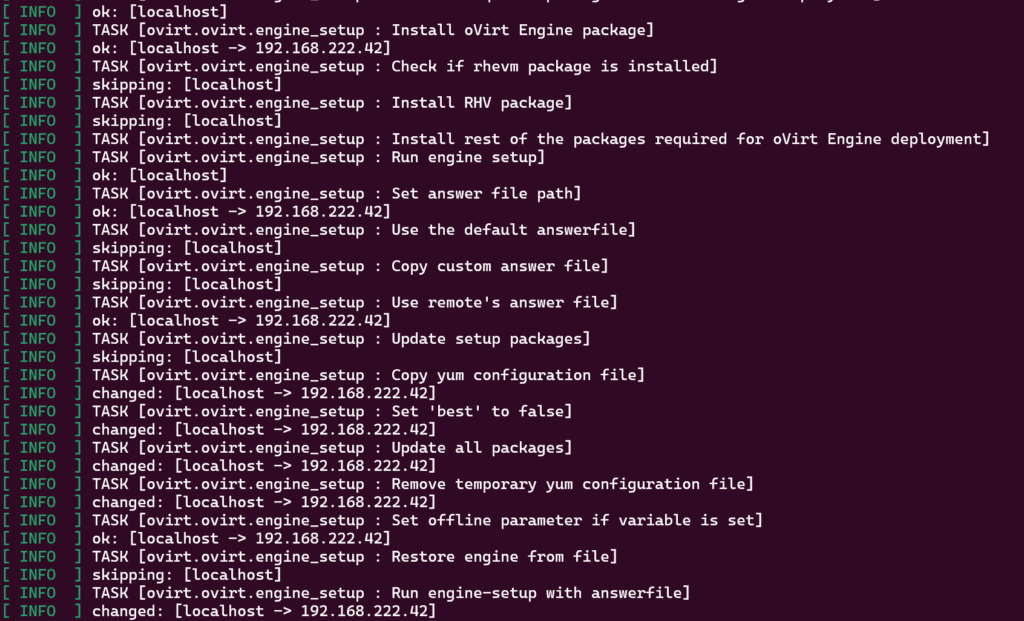
Then the oVirt engine gets installed and configured.
Note: Once the oVirt Engine starts it will reach back into your oVirt node and perform a range of extra configuration of the oVirt node.
The installer will then prompt you for shared storage options to add into the oVirt node. This is required as the installer will move the oVirt Engine VM from the oVirt node local disk to the shared storage for HA purposes.
In my case I chose NFS.
At this point, the installer asks the oVirt Engine to create the new storage domain. The oVirt Engine will talk to VDSM on the oVirt node to configure the shared storage.
Once the storage domain has been created, the installer will create the final oVirt Engine VM and copy the disk image from the local hard drive to the shared storage domain. You have an option to increase the disk size of the appliance. I left it at the default.
This will also take a while depending on your infrastructure.
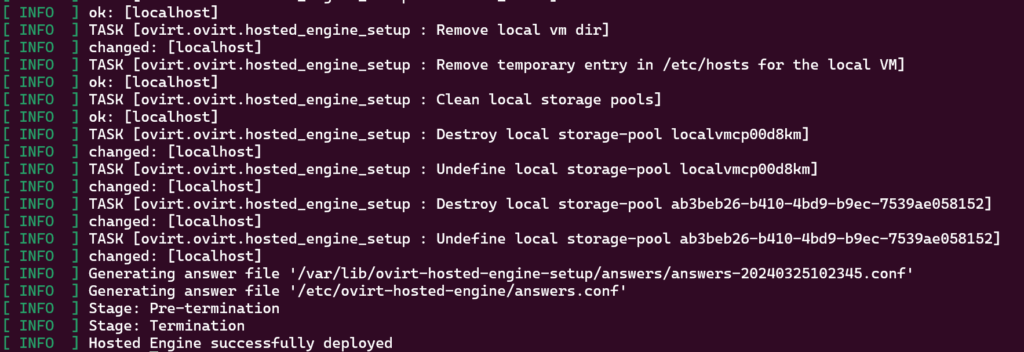
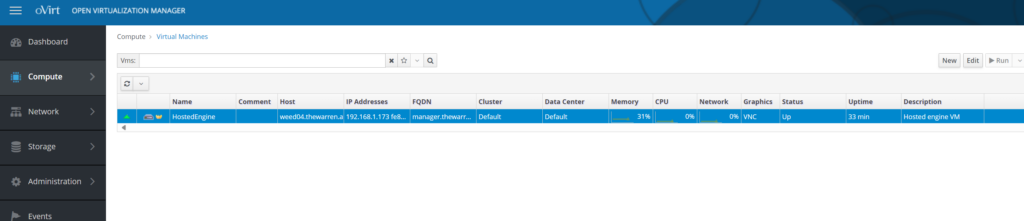
Eventually you will get to the end of the script and you’ll have an operational self-hosted oVirt Engine running on your oVirt node.
x86-64-v2 brings support (among other things) for vector instructions up to Streaming SIMD Extensions 4.2 (SSE4.2) and Supplemental Streaming SIMD Extensions 3 (SSSE3), the POPCNT instruction (useful for data analysis and bit-fiddling in some data structures), and CMPXCHG16B (a two-word compare-and-swap instruction useful for concurrent algorithms).
x86-64-v3 adds vector instructions up to AVX2, MOVBE (for big-endian data access), and additional bit-manipulation instructions.
x86-64-v4 includes vector instructions from some of the AVX-512 variants.
This is a great idea and goal except when you have perfectly good old hardware that, while end-of-life is still working and you find it doesn’t support the new compile target.
This nice little awk script from the fine folks over at stackexchange will show you what microarchitecture your cpu supports by looking at the /proc/cpuinfo flags. I’ve included a local copy here and as you can see it’s pretty simple.
#!/usr/bin/awk -f

BEGIN {
    while (!/flags/) if (getline < "/proc/cpuinfo" != 1) exit 1
    if (/lm/&&/cmov/&&/cx8/&&/fpu/&&/fxsr/&&/mmx/&&/syscall/&&/sse2/) level = 1
    if (level == 1 && /cx16/&&/lahf/&&/popcnt/&&/sse4_1/&&/sse4_2/&&/ssse3/) level = 2
    if (level == 2 && /avx/&&/avx2/&&/bmi1/&&/bmi2/&&/f16c/&&/fma/&&/abm/&&/movbe/&&/xsave/) level = 3
    if (level == 3 && /avx512f/&&/avx512bw/&&/avx512cd/&&/avx512dq/&&/avx512vl/) level = 4
    if (level > 0) { print "CPU supports x86-64-v" level; exit level + 1 }
    exit 1
}
Running the awk script on my test system reveals :
$ ./testarch.awk
CPU supports x86-64-v1
The implications of this are annoying for me. I was trying to get awx to work on my little play system, but as the awx container is based on centos9 and compiled requiring at least x86-64-v2 then the awx container just wont start – yes I know there is more to awx than just this container, but it highlights the point nicely in the following command.
$ docker run --rm  ghcr.io/ansible/awx:latest
Fatal glibc error: CPU does not support x86-64-v2
IBM DB2, in my view, is challenging to use and support due to its complexity compared to other databases. Despite this, some people highly regard it. My experience with it ranges from isolated mainframe deployments to modern distributed versions.
AWS
AWS now supports DB2 in their RDS family, offering features like provisioning, patching, backup, recovery, and failure detection. They’ve also introduced Cross Region automated backups, beneficial for DB2 databases used as corporate systems of record. AWS’s Data Migration Services now support DB2, offering full load and Change Data Capture migration modes.
In my view, AWS offers the best cloud integration for IBM DB2.
AZURE
Azure offers extensive options for running IBM DB2, focusing more on DB2’s technology rather than simplifying its management. This includes running DB2 HADR options. IBM views Azure as a platform for self-managed DB2 applications without much support for deeper cloud integration. Azure and its partners are skilled in managing complex DB2 workloads, including transitioning Z/OS based workloads to a cloud architecture based on purescale.
Summary
IBM DB2 is a complex, non-trivial database with different versions for distributed systems and Z/OS. It’s been battle-tested through extensive enterprise use. Now, AWS offers simplified database management, while Azure and AWS allow re-platforming from on-premises or mainframe to the cloud. It’s important to consider costs, including hidden ones in maintaining custom solutions. The addition of cloud-based DB2 solutions provides more options for organizations.
The symptom is when using the pip3 (python) version of docker compose you get :
kwargs_from_env() got an unexpected keyword argument ‘ssl_version’
Docker’s SDK for Python v7.0.0+ isn’t compatible with docker compose v1, which the python version of docker compose provides. To continue using the python version of docker-compose, ie docker compose v1, downgrade the docker SDK for python to v6.1.3.
However, as the Python version is deprecated, I’ve personally switched to docker compose v2, a golang implementation and sub-option of the Docker command.
docker compose version
Docker Compose version v2.21.0
If you still want to use the python version of docker-compose you’ll need to downgrade the docker sdk for python to version 6.1.3.
As part of my work and personal life, I need to keep track of project releases and activities for certain projects. While you can easily ‘watch’ a project, this doesn’t always work for how I want to be notified.
So, for releases, I choose to track via the RSS feeds that github maintains for each project.
Github provides several ‘ATOM’ feeds for projects that can be consumed. As an example, I track releases for the govmomi project at https://github.com/vmware/govmomi/releases. The url for the RSS feed is in the format
https://github.com/:owner/:repo/releases.atom
Which in my case would translate to :
https://github.com/vmware/govmomi/releases.atom
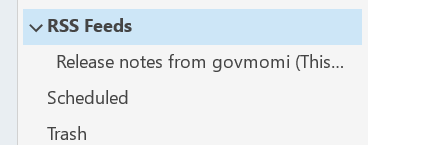
Now that I have the data, how do I consume it? Well I also use Outlook for home and work, so a common approach that works for me is to utilise the ‘RSS Feeds’ section in outlook.
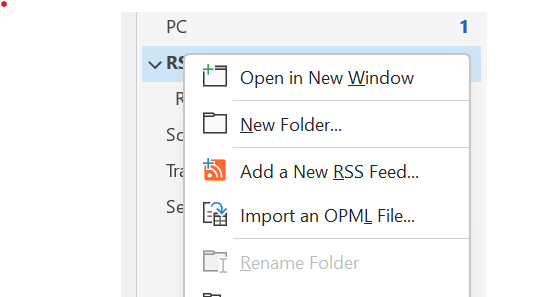
A simple, right-click on the RSS Feeds brings up the following dialogue to add the RSS feed URL.
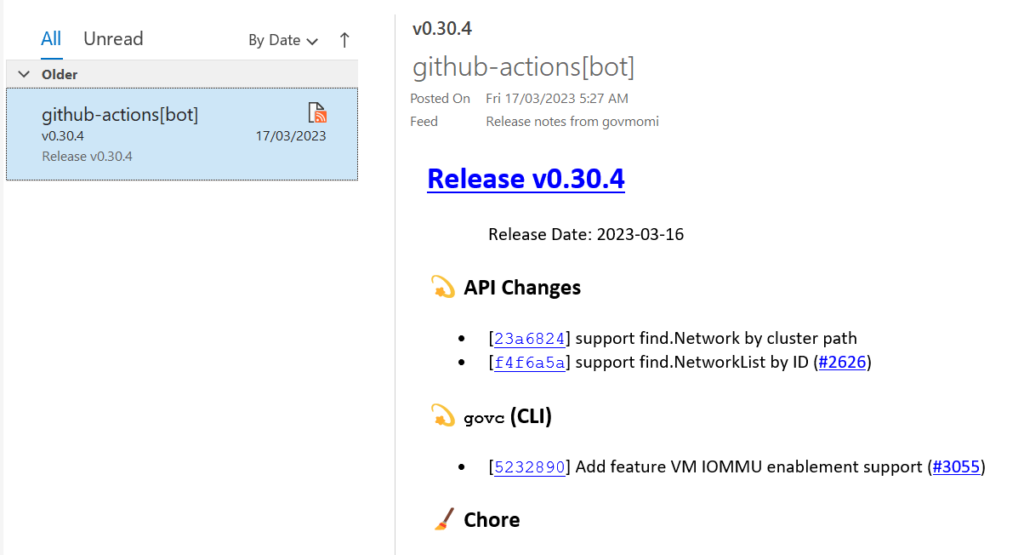
And hey presto, you get the feed presented in the same format you come to expect from your email.
Of course, there are other RSS feed readers, but this makes keeping track of releases trivial for me, perhaps it will be useful for you.
You need to get to the latest update level on the CentOS systems. If the systems have been unloved you will likely find that they can no longer access the repos servers.
Change the baseurl to http://vault.centos.org/, comment out the mirrorlist as per this image.
You can use containers inside container orchestration platforms and of course you can do that with phpIPAM as well, but in my case I just wanted the convenience of the container packaging approach and running it on a single Linux host without having to worry about the overheads of K8S style platforms.
I was using a RHEL derivative, Alma Linux 9.0 in this case and also using Podman rather than Docker.
I did want to use the docker-compose approach to configuring and maintaining the application. The compose format makes it really quite simple to deploy and maintain simple container applications that are single system hosted.
Since I wasn’t using Docker, rather Podman, I found that you can use a tool called podman-compose to orchestrate podman to deliver the outcome you’d expect from a docker-compose file.
Firstly, start like this, getting podman and pip3 installed.
yum install podman python3-pip
Then it’s simple to install podman-compose
pip3 install podman-compose
With a docker-compose.yml file similar to the following (change the default passwords i’ve put in the file) you can get going very quickly.
Then you connect to the IP address of your underlying system, and execute the installation dialogue. You should only need to enter the MySQL/MariaDB username / password, everything else should be pre-filled with the correct information.
I’ve been doing some work on Oracle’s Cloud as they provide a decent free tier to experiment with. I’ve been very pleasantly surprised with OCI and will likely move some of my personal workloads there.
It wasn’t without a bit of a head scratching experience though when I was trying to get application connectivity between two OCI images on the same private 10.0.0.0/24 network I had created.
eg.
curl http://10.0.0.53/
curl: (7) Failed to connect to 10.0.0.53 port 80: No route to host
My first thought was the cloud ingress rules, but i’d added the following as a first desperate attempt to get things working.
Try again, Still no route!
What I discovered is the OCI supplied images (I was using the Ampere Ubuntu 20.04 image in this case) have an interesting set of iptables rules baked into the image.
root@blog:~# cat /etc/iptables/rules.v4
# CLOUD_IMG: This file was created/modified by the Cloud Image build process
# iptables configuration for Oracle Cloud Infrastructure

# See the Oracle-Provided Images section in the Oracle Cloud Infrastructure
# documentation for security impact of modifying or removing these rule

*filter
:INPUT ACCEPT [0:0]
:FORWARD ACCEPT [0:0]
:OUTPUT ACCEPT [463:49013]
:InstanceServices - [0:0]
-A INPUT -m state --state RELATED,ESTABLISHED -j ACCEPT
-A INPUT -p icmp -j ACCEPT
-A INPUT -i lo -j ACCEPT
-A INPUT -p udp --sport 123 -j ACCEPT
-A INPUT -p tcp -m state --state NEW -m tcp --dport 22 -j ACCEPT
#-A INPUT -j REJECT --reject-with icmp-host-prohibited
-A FORWARD -j REJECT --reject-with icmp-host-prohibited
-A OUTPUT -d 169.254.0.0/16 -j InstanceServices
.
.
.
I’ve commented out the offending line. With OCI supplied images, even though the default filter is ACCEPT, they place a reject-with icmp-host-prohibited at the end of the INPUT table, which effectively rejects everything not specifically allowed (such as the port 22 rule the line before).
My two options were to either put in my specific allows (the right thing to do) or remove the reject and just use the INPUT filter default. I chose the latter as I was experimenting in this case and kept the information at my finger tips for more ‘production-like’ deployments.
The end result, communication between the 2 OCI Ubuntu instances over the private network now works fine.
Caveat: In my case I understood the risks associated with removing the reject for my Use Case. Please perform your own due diligence for your Use Case, you’re probably better off specifically adding the communication rules you want to allow.