Author: gocallag

docker-compose stopped working?

The symptom is when using the pip3 (python) version of docker compose you get :

kwargs_from_env() got an unexpected keyword argument ‘ssl_version’

Docker’s SDK for Python v7.0.0+ isn’t compatible with docker compose v1, which the python version of docker compose provides. To continue using the python version of docker-compose, ie docker compose v1, downgrade the docker SDK for python to v6.1.3.

However, as the Python version is deprecated, I’ve personally switched to docker compose v2, a golang implementation and sub-option of the Docker command.

docker compose version
Docker Compose version v2.21.0

If you still want to use the python version of docker-compose you’ll need to downgrade the docker sdk for python to version 6.1.3.

pip3 list | egrep docker
docker                    7.0.0
pip3 install docker==6.1.3
Collecting docker==6.1.3
.
.
.

Keeping track of GitHub Project releases

As part of my work and personal life, I need to keep track of project releases and activities for certain projects. While you can easily ‘watch’ a project, this doesn’t always work for how I want to be notified.

So, for releases, I choose to track via the RSS feeds that github maintains for each project.

Github provides several ‘ATOM’ feeds for projects that can be consumed. As an example, I track releases for the govmomi project at https://github.com/vmware/govmomi/releases. The url for the RSS feed is in the format

https://github.com/:owner/:repo/releases.atom

Which in my case would translate to :

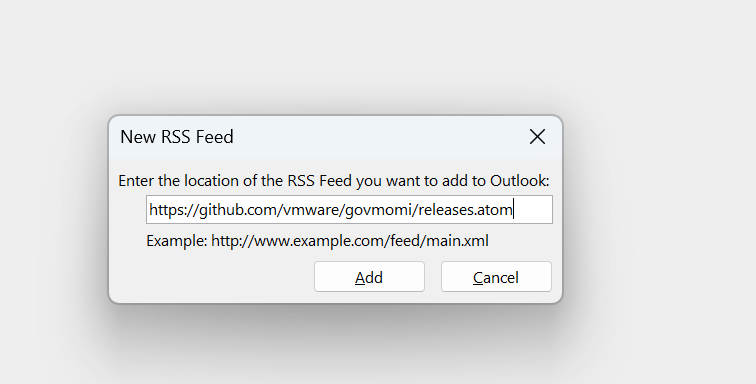
https://github.com/vmware/govmomi/releases.atom

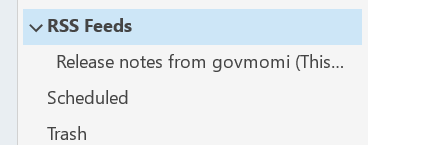
Now that I have the data, how do I consume it? Well I also use Outlook for home and work, so a common approach that works for me is to utilise the ‘RSS Feeds’ section in outlook.

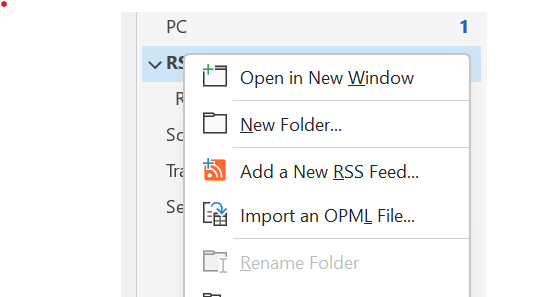
A simple, right-click on the RSS Feeds brings up the following dialogue to add the RSS feed URL.

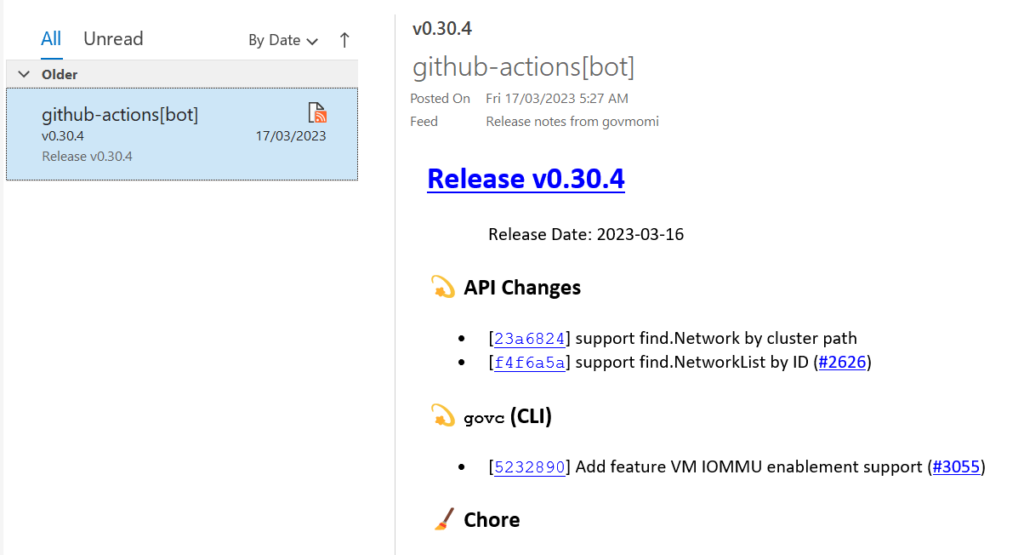
And hey presto, you get the feed presented in the same format you come to expect from your email.

Of course, there are other RSS feed readers, but this makes keeping track of releases trivial for me, perhaps it will be useful for you.

Converting from CentOS 8 to AlmaLinux 8

This is more so that I can remember.

You need to get to the latest update level on the CentOS systems. If the systems have been unloved you will likely find that they can no longer access the repos servers.

Change the baseurl to http://vault.centos.org/, comment out the mirrorlist as per this image.

You’ll need to do this in at least :

/etc/yum.repos.d/CentOS-Linux-BaseOS.repo
/etc/yum.repos.d/CentOS-Linux-AppStream.repo

Then you can perform the required upgrade :

dnf update
dnf upgrade

Then I suggest re-booting and you can then perform the AlmaLinux migration by :

curl -O https://raw.githubusercontent.com/AlmaLinux/almalinux-deploy/master/almalinux-deploy.sh
bash almalinux-deploy.sh

Then the following should show that you’ve converted OK

cat /etc/os-release
cat /etc/os-release
NAME="AlmaLinux"
VERSION="8.6 (Sky Tiger)"
ID="almalinux"
ID_LIKE="rhel centos fedora"
VERSION_ID="8.6"
PLATFORM_ID="platform:el8"
PRETTY_NAME="AlmaLinux 8.6 (Sky Tiger)"
ANSI_COLOR="0;34"
LOGO="fedora-logo-icon"
CPE_NAME="cpe:/o:almalinux:almalinux:8::baseos"
HOME_URL="https://almalinux.org/"
DOCUMENTATION_URL="https://wiki.almalinux.org/"
BUG_REPORT_URL="https://bugs.almalinux.org/"

ALMALINUX_MANTISBT_PROJECT="AlmaLinux-8"
ALMALINUX_MANTISBT_PROJECT_VERSION="8.6"
REDHAT_SUPPORT_PRODUCT="AlmaLinux"
REDHAT_SUPPORT_PRODUCT_VERSION="8.6"

phpIPAM via podman-compose

You can use containers inside container orchestration platforms and of course you can do that with phpIPAM as well, but in my case I just wanted the convenience of the container packaging approach and running it on a single Linux host without having to worry about the overheads of K8S style platforms.

I was using a RHEL derivative, Alma Linux 9.0 in this case and also using Podman rather than Docker.

I did want to use the docker-compose approach to configuring and maintaining the application. The compose format makes it really quite simple to deploy and maintain simple container applications that are single system hosted.

Since I wasn’t using Docker, rather Podman, I found that you can use a tool called podman-compose to orchestrate podman to deliver the outcome you’d expect from a docker-compose file.

Firstly, start like this, getting podman and pip3 installed.

 yum install podman python3-pip

Then it’s simple to install podman-compose

pip3 install podman-compose

With a docker-compose.yml file similar to the following (change the default passwords i’ve put in the file) you can get going very quickly.

version: '3'

services:
  phpipam-web:
    image: docker.io/phpipam/phpipam-www:latest
    ports:
      - "80:80"
    environment:
      - TZ=Australia/Melbourne
      - IPAM_DATABASE_HOST=phpipam-mariadb
      - IPAM_DATABASE_USER=root
      - IPAM_DATABASE_PASS=<mysql_root_pass>
    restart: unless-stopped
    volumes:
      - phpipam-logo:/phpipam/css/images/logo
    depends_on:
      - phpipam-mariadb

  phpipam-mariadb:
    image: docker.io/library/mariadb:latest
    environment:
      - MARIADB_ROOT_PASSWORD=<mysql_root_pass>
    restart: unless-stopped
    volumes:
      - phpipam-db-data:/var/lib/mysql

volumes:
  phpipam-db-data:
  phpipam-logo:

Then it’s as simple as

podman-compose up -d

Then you connect to the IP address of your underlying system, and execute the installation dialogue. You should only need to enter the MySQL/MariaDB username / password, everything else should be pre-filled with the correct information.

OCI: No route to host?

I’ve been doing some work on Oracle’s Cloud as they provide a decent free tier to experiment with. I’ve been very pleasantly surprised with OCI and will likely move some of my personal workloads there.

It wasn’t without a bit of a head scratching experience though when I was trying to get application connectivity between two OCI images on the same private 10.0.0.0/24 network I had created.

eg.

curl http://10.0.0.53/
curl: (7) Failed to connect to 10.0.0.53 port 80: No route to host

My first thought was the cloud ingress rules, but i’d added the following as a first desperate attempt to get things working.

Try again, Still no route!

What I discovered is the OCI supplied images (I was using the Ampere Ubuntu 20.04 image in this case) have an interesting set of iptables rules baked into the image.

root@blog:~# cat /etc/iptables/rules.v4
# CLOUD_IMG: This file was created/modified by the Cloud Image build process
# iptables configuration for Oracle Cloud Infrastructure

# See the Oracle-Provided Images section in the Oracle Cloud Infrastructure
# documentation for security impact of modifying or removing these rule

*filter
:INPUT ACCEPT [0:0]
:FORWARD ACCEPT [0:0]
:OUTPUT ACCEPT [463:49013]
:InstanceServices - [0:0]
-A INPUT -m state --state RELATED,ESTABLISHED -j ACCEPT
-A INPUT -p icmp -j ACCEPT
-A INPUT -i lo -j ACCEPT
-A INPUT -p udp --sport 123 -j ACCEPT
-A INPUT -p tcp -m state --state NEW -m tcp --dport 22 -j ACCEPT
#-A INPUT -j REJECT --reject-with icmp-host-prohibited
-A FORWARD -j REJECT --reject-with icmp-host-prohibited
-A OUTPUT -d 169.254.0.0/16 -j InstanceServices
.
.
.

I’ve commented out the offending line. With OCI supplied images, even though the default filter is ACCEPT, they place a reject-with icmp-host-prohibited at the end of the INPUT table, which effectively rejects everything not specifically allowed (such as the port 22 rule the line before).

My two options were to either put in my specific allows (the right thing to do) or remove the reject and just use the INPUT filter default. I chose the latter as I was experimenting in this case and kept the information at my finger tips for more ‘production-like’ deployments.

The end result, communication between the 2 OCI Ubuntu instances over the private network now works fine.

Caveat: In my case I understood the risks associated with removing the reject for my Use Case. Please perform your own due diligence for your Use Case, you’re probably better off specifically adding the communication rules you want to allow.

Getting started with Powershell on Linux

First of all, simply don’t believe anyone who says that it’s hard to install Powershell on Linux.

Installing on a Red Hat clone (eg. Centos 8)

This wont take long.

curl https://packages.microsoft.com/config/rhel/7/prod.repo | sudo tee /etc/yum.repos.d/microsoft.repo
sudo yum install -y powershell

That’s it

Installing on Ubuntu 20.04 and above

sudo snap install powershell --classic

Again, that’s it.

In both cases you can then launch the shell via :

$ pwsh
PowerShell 7.2.0
Copyright (c) Microsoft Corporation.

https://aka.ms/powershell
Type 'help' to get help.

PS /home/gocallag> 

Converting Centos 8 to Centos 8 Stream – because you know you want to!

This is more so I can remember, but it’s basically 3 steps.

Apply all the latest patches to your Centos 8 systems

dnf update -y
reboot

Then install the Centos 8 stream repo’s

dnf install -y centos-release-stream

Then swap from Centos Linux repo’s to Centos stream repo’s

dnf swap -y centos-{linux,stream}-repos

Then do a distro sync to get everything back in sync

dnf distro-sync -y
reboot

You should be golden at this point

Fresh Openshift Cluster install (4.6) on vSphere doesn’t complete – Cluster Monitoring Operator stuck

It’s a simple issue to resolve, but just a little annoying.

The CVO doesn’t complete because the Cluster-monitoring-operator pod rollout stuck with error message CreateContainerConfigError.

The actual error shows that :

Error: container has runAsNonRoot and image has non-numeric user (nobody), cannot verify user is non-root

This is still an open issue with Red Hat and it’s being tracked via this BZ. It is however easily corrected by deleting the offending pod and letting it get re-created

Dotnet core 3.1 on Raspberry Pi 4

Don’t believe sites telling you it’s hard to install Dotnet core on a Raspberry Pi 4 – it isn’t and hopefully I haven’t tempted fate by showing how simple it is 🙂

pi@raspberrypi:~ $ lsb_release -a
No LSB modules are available.
Distributor ID: Raspbian
Description:    Raspbian GNU/Linux 10.3 (buster)
Release:        10.3
Codename:       buster

Wander over to https://dotnet.microsoft.com/download/dotnet-core/scripts and you’ll find the installation script. You can download the bash script and execute it.

pi@raspberrypi:~ $ bash dotnet-install.sh
dotnet_install: Warning: Unable to locate zlib. Probable prerequisite missing; install zlib.
dotnet-install: Downloading link: https://dotnetcli.azureedge.net/dotnet/Sdk/3.1.201/dotnet-sdk-3.1.201-linux-arm.tar.gz
dotnet-install: Extracting zip from https://dotnetcli.azureedge.net/dotnet/Sdk/3.1.201/dotnet-sdk-3.1.201-linux-arm.tar.gz
dotnet-install: Adding to current process PATH: `/home/pi/.dotnet`. Note: This change will be visible only when sourcing script.
dotnet-install: Installation finished successfully.

Then it’s just a simple case of adding /home/pi/.dotnet to your system PATH variable.

pi@raspberrypi:~ $ dotnet --version
3.1.201

Wondering about the missing pre-requisite for zlib – so was I. The installer is looking for zlib via a ldconfig command. It seems package zlib1g-dev installs it as libz so the check fails. I’ll update this post if I run into any actual problems.

Ansible Tower provider for Cloudforms / ManageIQ

Always fun to strike problems in what should be the simplest things. I wanted to add Ansible Tower as a service into ManageIQ. Cloudforms would have a similar result.

Following the very simple instructions at https://www.manageiq.org/docs/reference/latest/doc-Managing_Providers/miq/index I proceeded to add the new provider.

It’s all pretty straight forward. Putting in the URL to my Tower server I get greeted with a bunch of errors.

Credential validation was not successful:  {:headers=>{"server"=>"nginx", "date"=>"Mon, 13 Jan 2020  23:42:12 GMT", "content-type"=>"text/html; charset=utf-8",  "content-length"=>"3873", "connection"=>"close",  "vary"=>"Cookie, Accept-Language, Origin",  "content-language"=>"en", "x-api-total-time"=>"0.046s"
.
.
.
blah blah
.
.
status=>404

By default ManageIQ and Cloudforms search for /api/v1 on the Tower server. /api/v1 was deprecated and removed as of Ansible Tower 3.6, see https://docs.ansible.com/ansible-tower/latest/html/towerapi/conventions.html

So, what is a person to do? Hit the google. Eventually I came across this bugzilla item https://bugzilla.redhat.com/show_bug.cgi?id=1740860 and it gave a hint as to just specifying the /api/v2 in the URL I gave to ManageIQ rather than just the base hostname. eg. https://blah…./api/v2

Tried it, it worked! My credential validated and a provider refresh was automatically initiated and all my Ansible Tower templates and inventories were discovered correctly.

Navigation